What’s A Geofence? (And What Can They Do?)
If you own a GPS tracker, or have just been shopping for one, you have probably come across the term geofence (or geofencing). This isn’t a very commonly used word outside of GPS applications so it may be a bit confusing. In this short article we’ll explain geofences in plain language. We’ll talk a bit about what they can do and even look at how to use them using the GoTrack app as an example.
A Quick Definition

Let’s start with an easy to understand explanation. A geofence is an imaginary border drawn around a point by a GPS tracking system. You simply pick a location and decide how large of an area to include inside the imaginary fence. Once a geofence is created, it can used as a trigger for alerts and events. For example, your tracker system can tell you whenever one of your vehicles enters or leaves the area. It is kind of like an invisible pet fence, but instead of setting off a dog collar it sends a message to the tracking system. If you do not use GoTrack and just want to learn about using geofences, skip ahead to Family Uses For A Geofence.
If you are using a GoTrack product, first log into your account on GoTrack.com. Once you have, find the tab on the right side of the screen titled Locations (it is between Fleets and Users on the top right corner of the page). By clicking on it you will see a list of your locations. These locations are the centers of your geofences.
Starting on the left, the first column (“Location”) lists the locations you have defined. To the right the “For” column names the users associated with this location. Of course, this only matters if you have multiple users. Next is the “Address” column, which constians the street address of the location. The next column to the right is titled “Radius.” This shows how large of an area around the location is included in the geofence. The final column (“Notify?”) will have a YES entry if you have set up any alerts for this geofence.
Setting Up Geofencing
If you need to create new geofences for your GoTrack devices, just click “Add New Location” near the top right corner of the screen. When you do, a new screen will be shown. On the right will be a map of North America and on the left is a simple form that will allow you to define a new geofence. It is very easy to create new geofences; it only take a few seconds! As an example, let’s create a geofence around your home.
Name Your New Geofence
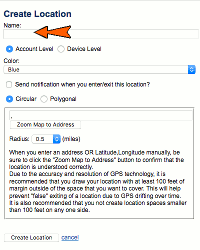
First, enter a title for the geofence under the “Name” field. In our example, HOME seems like a great title. You could use the area’s address, a business or person’s name, or even a client number. Use whatever makes sense to you to differentiate your geofences. Under the Name you can select “Account Level” or “Device Level.” Selecting Account Level creates a geofence that is seen by all devices in your account (if you have multiple devices). Choosing “Device Level” associates a single GPS tracking unit with the geofence. A dropdown list will appear allowing you to select the devices you wish to add. Finally, you are also able to choose a color for your geofence. This is simply a matter of personal preference; it makes no difference to actual operation.
Enabling Alerts
You are then asked “Send notification when you enter/exit this location?” Check the box so you will receive alerts when your tracker moves through the geofence. Next you will select the geofence’s shape. It can be Circular (with the precise location in the center) or Polygonal (which allows you to select the shape of the geofence). Honestly, it is easier to select circular.
Under the selection between Circular and Polygonal is a blank field. Enter the address or latitude and longitude coordinates for the center of your geofence. In our example you would simply type your home’s street address. Next, you are asked to select a radius in miles (assuming you are creating a circular geofence). You can narrow the geofence down to a .1 mile radius (which is probably best for a home) or make it as large as 100 miles. Finally, click the “Create Location” button to add your new geofence to your tracking system. Whenever your car moves through this imaginary circle your system will alert you. This means you receive alerts both when the car leaves and enters the geofence.
Family Uses For A Geofence
Families should use geofencing to get the most out of a GPS tracker. Using our example, the geofence set up around your house will alert you whenever the family car leaves or returns home. This can help you in a number of ways. It allows you to see that your teen driver has left for school on time or got home before curfew. Speaking of school, geofencing an area around your teen’s school or job you will be able to see that they are arriving on time every day. A geofence set up around your home will also alert you if someone tries to take your car once it is parked at the end of the day. You can also set geofences around work, favorite stores and other locations you commonly visit. Save yourself from multiple trips by setting up an alert around your favorite grocery store. Whenever someone is at the store you will be alerted and can text them those last minute additions to the grocery list. You can also set geofences up around places you don’t want someone to go!
Business Fleet Geofencing Uses
As useful as geofencing is for families, business can get even more use out of the system. Establishing a geofence around your business allows you to record when your fleet leaves and returns every day. This could easily replace a time clock. If your fleet follows a consistent route, geofences can be set up for each stop. This way you are automatically alerted as your vehicles progress through the work day. You can make sure everything is on schedule without interrupting your drivers. It will also allow you to see which stops take the most time. You may want to use geofences to divide areas into sales regions or even mark that nearby town who loves to pull over your drivers. Construction firms can place geofences around job sites with expensive equipment outfitted with a battery operated GPS tracker (like the TTU-720). Then, if anyone takes the equipment outside of the geofence an alert is sent!
“No-Go” Zones
Geofences do not have to be centered on locations where you do business. If there are locations that you expect your employees to avoid then set up a geofence around it. Whenever one of your company vehicles moves into this virtual zone, you will receive an alert. If the vehicle enters and then leaves the zone in a matter of seconds, you know your employees were simply passing by. However, if the vehicle remains within the geofence for any length of time you can check on exactly what is happening.
Your use of geofencing is really only limited by your imagination. You will undoubtedly create many new uses specific to your family or business now that you understand them. You can also learn more ways to use GPS tracking to your advantage in the article Five Ways Your Business Should Be Using Vehicle Tracking.