Set Up Alerts On GoTrack GPS Tracking Devices [Step By Step]

GPS tracking devices make it easy for business owners to manage their fleet. Families use them to keep an eye on family vehicles . With units such as the GoTrack EZ, which simply plugs into most cars, installing trackers is simple. Then you just log into the GoTrack website or GoTrackEZ mobile app (for iPhones and Android), to where your vehicles are at any time. In an instant you receive real time position reports and more. However, you do not have to actively manage your vehicles by checking into the website or app. You can set up your trackers to let you know when something happens. This is called a notification, or alert, and you can easily customize your notifications to get the information you want.
How Your GPS Tracking Devices Can Alert You
By default, your GoTrack GPS tracking devices will send alerts to the email account you have associated with your GoTrack account. If you constantly check your emails (which many of us do, thanks to smartphones), this might be the best option. If you choose email alerts then proceed to the next section. However, you can have your GPS tracking devices alert you via text message if you prefer. You can learn to set up text alerts here. Once you have decided how your GPS tracking devices alert you it is time to select which notifications you want!
Choose Your Alert Triggers
Most alerts can be turned on and off through the Settings tab of your account. If you want email notifications then go to the Settings tab of your normal account. If you decided on text notifications, go the Settings tab while you are logged in with the special user you just created.
Basic Alerts
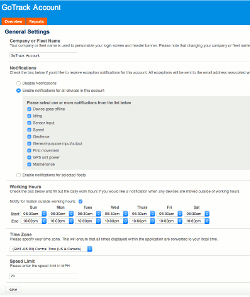
On the Settings screen you will find a list of possible alerts (called Notifications). First, select “Enable notifications for all devices in this account.” Then, you can pick and choose which of the alerts you would like. Most, such as “Device goes offline,” are fairly self explanatory. “General purpose input/output” and “Sensor input” are special alerts for advanced installations. “Idling” when send an alert when a vehicle is running but not moving. This can be particularly useful for business users. It might indicate that your workers are just sitting in their vehicles! “Geofence” allows you to set up location based alerts (more on that in a second).
The easiest option is to simply select all notifications, especially when you are first setting up GPS tracking devices. This way you get the maximum amount of information. You can always turn off unwanted notifications later.
Working Hour Notifications
You can also set up a time based alert. Under the “Notifications” section you will see a section marked “Working Hours.” This allows you to set up specific hours when your vehicles are expected to drive. If any of the GPS tracking devices move outside of those hours, you will receive an alert. Simply select the “Notify for motion outside of working hours” option and then set a Start and End time each day using the drop down lists. Parents might want to set their teen drivers’ curfew as End times. Business fleets can set times to match their work hours. Be sure to select the proper Time Zone (Eastern, Central, etc) or your alerts will not match your local time!
Finally, you have the option to set a speed limit for your GPS tracking devices on the Settings page. By entering a speed, you will get an alert whenever one of the GPS tracking devices senses it is moving faster than the set limit. This function will not notify you if the vehicle is moving faster than the local speed limit! For most users it is advisable to set the speed limit to the local highway speed limit.
Geofences Or Location Alerts
Geofence alerts, which are notifications triggered by location, alerts require a little extra to set up. While still in your account, select the “Locations” tab. This will display a summary of any locations you have already marked in your system. By clicking “Add new location” in the top right corner, you can mark a new location. A simple form will open with a map displayed on the right hand side of the screen.
Name Your Geofence
First you will be asked to name the location. This can be anything that works for you, such as “Home,” “School,” “Gramma’s,” “Warehouse,” “Jones Plumbing,” etc. Business owners can mark clients, key points along delivery routes, store locations and more. Families may want to mark home, work and schools. We suggest at least marking your home (for families) or where vehicles park at night (for businesses). Next, you will be asked to pick whether the geofence is account level (all the trackers you have) or device level (for a specific tracker). You can set a color to the geofence if you wish. Color makes no difference to how a geofence works, only how it will appear on the map.
Define The Location
Under the Color selection there is a check box marked “Send notification when you enter/exit this location?” Make sure that you click this box so a check mark appears in it. You can also select between a circularly shaped or polygonal geofence. The easiest way to set up a geofence is to select a circular shape and then enter a value in the radius dropdown. Finally, enter an address and click the Create Location button. If you chose a polygonal area, after entering the address click the Zoom Map to Address button. You now must click the map near the address, move your mouse and then click a second location. A line will appear between the two points you clicked. Continue to click on the map to draw additional lines and form a shape around your address. Your last click must be in the same spot as your first click to “close” the shape of the geofence. Finally, click the Create Location button.
Testing Your Alerts
Your GPS tracking device notifications should now be ready to go, but they might not be right for you. The truth is that you really won’t be sure until you have tried them out for a few days. After a week or two, evaluate the alerts you have created. Perhaps you will need to adjust the working hours or speed limit. Maybe you will think of additional geofences that would be helpful. After you have used the alerts for a few days you will have a much better idea of how they can help you. Once you have set up the perfect alerts, you will finally get the most out of your GPS tracking devices!